So you want to go bicycle riding in Montana?
Apr 09 2013 · 0 comments · Miscellaneous ·4
Spring has sprung. The birds are singing. Love and romance are in the air. The nostalgia of a bicycle ride whifs through the air. The freedom of the road. The undiscovered byways…
Montana is a vast resource of roads to get lost on. But before you embark on that fantastic journey, let’s remember one thing. The imminent FLAT. Or in the case of many a Montana road, many flats. One of the joys of riding in Montana is the assortment of dirt roads that criss-cross and link main roads. Using these dirt roads can extend a loop or connect an epic ride taking you to the middle of nowheresville – and nowheresville is where it will happen. The dreaded snake-bite pinch flat…
But don’t fret, because you are reading this, you too will be prepared to suck the venom from that nasty predicament.
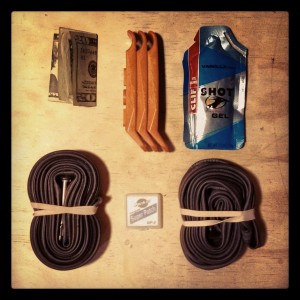
Now is the time to prepare your “kit” for the season. Here’s a checklist of items you should consider carrying with you. It’s small enough for the shortest ride yet complete enough to get you through that unexpectedly long tour.
1. Two tubes
2. Patch Kit
2. Tire Irons (if you have trouble removing tires w/o them)
4. $22
5. 1 Clif Shot
6. Pump
2. Tire Irons (if you have trouble removing tires w/o them)
4. $22
5. 1 Clif Shot
6. Pump
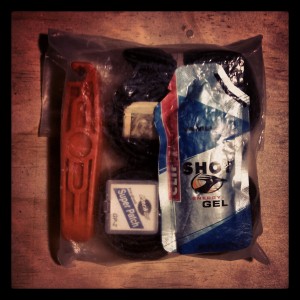
I carry all of this, with the exception of the pump, in a zip-lock baggy in my jersey pocket. You can also throw a cell phone in there – it’ll stay dry. I keep my kit by my bike and grab it every time I head out.
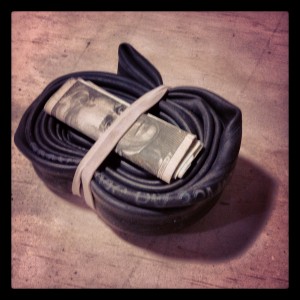
Two tubes – yes, two. It really sucks patching a tube so why not have a backup. If you are really a team player, you’ll carry long-stem tubes even if your rims take short ones – just in case your buddy isn’t as prepared as you (even though he can afford deep dish carbon). If you prefer a seat bag, make sure you switch out the tubes at the first of the season. A tube in a seat bag will develop holes from all the jarring – it is a real drag to pull out a “new” tube and find holes in it – bummer.
Patch Kit – I prefer the stick on kind for the quick fix. Plus if you get the Park ones, they come in a super small package. Make sure you have at least 4 patches in there. Also make sure they are new as they tend to decay over time. This goes for standard patch kits too – especially if kept in a seat bag. The glue in a standard patch kit will dry out over time. Best to buy a new patch kit – whether stick-on or standard – at the start of the season.
Tire Irons – Get the plastic ones. They weigh less, are easier on your rims and don’t rub against your “new” tubes in your kit. If you hone your skills at removing a tire without them, you can leave the tire irons out. It’s worth having someone show you how to remove and install a tire without them.
$22 – One twenty and two ones. The twenty will get you a coke and a slice of apple pie in nowheresville where they don’t take plastic. The two $1 bills will work for the same, but will also patch a torn tire. Place a folded $1 bill between the tube and the tire (on the inside) and voila! Tire fixed. It’ll get you home.
1 Clif Shot – It’ll get you home too – or at least to said apple pie slice. They are small & easily fit in the zip-lock.
Pump – Preferably a frame pump. A good one that can get to 110 psi with a reasonable amount of effort. Don’t skimp on this. A good pump makes life a lot easier. The new ones that mount to the side of your waterbottle cage almost disappear. Ditch the CO2 cartridges – but if you must, carry a pump too.
ZIP-LOCK – The zip-lock works well for many reasons: 1) keeps your tubes lasting longer, 2) stays dry, 3) you can leave it with your pump and waterbottle at the race starts, 4) fits your cell phone, 5) cheap to replace, 6) can have more than one – mtn, road, cross setups. You may want to consider carrying a credit card too on those longer rides – one fits nicely alongside a tube.
It’s the scout motto right? Be prepared. It makes sense.
Now you can confidently go back to the romantic, instagram moments on your bicycle rides. Enjoy.
El Jefe
4

